WELCOME! Come on and have a seat on my porch swing or would you rather go for a ride on a vintage bike? Feel free to have yourself a look around my blog. You'll find all kinds of goodies, from cookin' to farmin', to craftin', to just plain ole fun. Just look through the archives or click on one of the topics of interest to see posts related to whatever your little heart desires. You can also click on THE BAKERY header on this page to go to the most current post.

Showing posts with label kitchen. Show all posts

Friday, December 16, 2011

The Ultimate Sinnamon Rolls (Includes Cheater Directions)

Are you a cinnamon roll junkie?
Well, I am NOT.
Until I tried this recipe.
One of my friends over at Fabric, Food, and Photos brought
some of these to Sunday School.
When I asked her for the recipe, she said she learned about them from
Ashley Ann of Under the Sycamore blog.
Ashley Ann hosts a wonderful photography workshop and food is
included.
We found out Ashley got the recipe from her sister, Lesley.
HERE IS THE ORIGINAL RECIPE.
I have since modified my version of this recipe and cannot tell
a difference.
I use my own ROLL recipe, however there is a cheater version of
using the frozen Rhodes Cinnamon Rolls.
Believe me, I wouldn't hold it against you if you did this version.
I was going to do it also, but our lovely ONLY grocery store
does not carry the Rhodes Cinnamon Rolls.  :(
If your store doesn't have them, but they DO have the Rhodes Bread Loaf,
USE IT.

Roll and press out the loaf to resemble a rectangle.
This is a great workout by the way.
If you have small children, they can learn their shapes!
Did I tell you I flunked shapes 101?

The original recipe called for making a wonderful mixture of
brown sugar and VANILLA ICE CREAM!
This tickled me to death.....at first.
It takes TIME.
I decided to do the CHEATER VERSION.
I wandered the aisles looking for the ice cream topping...
I was beginning to worry that our ONLY grocery store
didn't carry it.
FINALLY my amazing husband wandered over by the PAPER PRODUCTS
and THERE IT WAS in all it's GLORY!!!
Yes, you read that correctly...PAPER PRODUCTS...CARAMEL....
I have no idea what the logic is to that....

I used the ENTIRE jar!!!
You just pour it in the GLASS cake pan...yep, that easy.
SIDE NOTE:  These Sinnamon rolls are better in a glass pan for some reason.
I used my wonderful Pampered Very Seasoned Chef pan, and they
weren't as good.

Next step is to take a WHOLE stick of SOFTENED butter
and slather it on the dough....making sure you get to the edges.

Next:  Sprinkle a GENEROUS amount of cinnamon
and get to the edges...it is okay if you get off the edges too.

Next is BROWN SUGAR....I used light because that
is what I have and wouldn't know if you can tell a difference
with dark brown sugar.  PILE IT ON.
No measuring here.

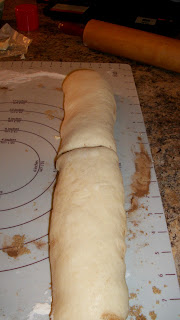
Starting with the LONG side, begin to roll that baby up....
making a giant tootsie roll.


 Once it is rolled, I either stretch it or scrunch it to make it
go from the 8" on the left of the mat to the 8" on the right side.
I guess that makes is 16" long, right?
You are going to DIVIDE the dough now....
start by cutting it in 1/2.
Be careful not to cut your mat if you are using one.
By the way, this is a Pampered Chef Pastry Mat....LOVE IT!!
I got it FREE when I hosted a party.

Then you cut each 1/2 into 1/2.
Now you have FOUR!

Now each 1/4 needs to cut into 1/3rds.
The cutting distorts them a little, just push them back together
and place them in the pan ON TOP of the cheater caramel.

Say hi to college girl, Sydni.
She loves these and wanted to learn how to make them.

Here they are all ready for their last rising before being baked.
At this point, we lightly sprayed the top with Pam and put
plastic wrap over the top.
I put the plastic wrap tight since I wanted to let them rise OVERNIGHT
in the fridge.
If you don't want them to rise overnight, just place them in a draft free spot
until they double in size.
My secret place is in the MICROWAVE with the stove top light ON...it heats up
the INSIDE of the microwave just right for proofing bread!

Here they are after rising in the fridge overnight.
(TOP VIEW)

(SIDE VIEW)
See how they are almost to the top?
Since I had the GLASS pan in the fridge, I let it set a bit while
the oven warmed up...DO NOT take them right out of the
fridge and pop it in the oven.....It could shatter the pan.
It could shatter your dreams of wonderful Sinnamon Rolls too.
Set oven to 350 degrees.

While they are baking, set out:
1 Oz. of cream cheese and let soften.
1/4 cup of butter and let soften.
Get together:
1 cup of powdered sugar
1/2 tsp. of vanilla
1 1/2 tsp of milk

Once the cream cheese and butter are softened,
mix ALL ingredients....
WHIP IT - WHIP IT GOOD!!!!

When it is whipped, you will have some glorious frosting
while turns them from Cinnamon Rolls, to SINNAMON ROLLS.
Honestly, I think the CARAMEL is what turns them into
SINNAMON ROLLS....see how it bubbles up around them while baking?
It is bubbling into the cracks and crevices....and
baking INTO the rolls.
Here they are baked.
If for some reason, they seem to brown too fast in some areas...
you can cover loosly with foil.
It takes about 30 minutes in my oven.
Since we like ours goooooey....we don't let them brown too too much.
Let them cool a tad before putting the frosting on or it will run all down into
the cracks.....
Just try them....do the cheater version.....
Tell me you don't change the name to SINNAMON ROLLS.
ENJOY!!!!

Saturday, April 30, 2011

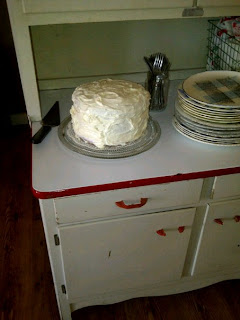
My Very First Layered Cake!

I am not a cake baker.
When I bake a cake, it will be reallllly thin...not fluffy and has hard edges.
So, while on my weekly grocery shopping trip to Aldi's, I noticed
a cake mix for a spring confetti-type cake.
I decided at that moment, I CAN DO THIS.
I wanted to try a layered cake....
I bought to boxes for this cake.
I bought the special little round cake pans...at $4.00 EACH...ouch.


I mixed up both boxes...fully picturing that ONE box would make ONE round pan
and the other box would fill the OTHER round pan.
Yah, you see where this is going don't you.....
I have no idea what I was thinking.....
I only had TWO round pans.....and too much cake mix.
Not once did it cross my mind to make CUPCAKES....nope, not once.
What did I do?
I grabbed a glass pie pan.
I made a THIRD layer.

(Picure is sister, Terri, getting the first piece of cake)
It worked!!!
Cake was so fluffy and tall that the cake pan lid STUCK to the top of the cake!
I worried because I made it late in the evening and was very tired.
I pondered how I would frost the cake, because even I KNOW that
you don't frost a warm cake.
My friends in FLYLADY CHAT helped me....
I decided to leave them covered with a towel on a cooling rack overnight.
I put the layered cake together in the a.m.
This cake flavor really resembled a wedding cake flavor.
I used too much frosting....but some people like that much frosting.
I, however, will not use that much next time.
See the post below this post to see the price of the cake mix.

Monday, April 25, 2011

Do You Shop at Aldi?


Several years ago, I was driving by some construction and noticed
a semi-truck with some advertising on it.
It said, "Save 50% or Better on Groceries"
To be honest, I thought the building looked a lot like
a pharmacy.  I didn't recognize the name Aldi.
When it finally opened, I decided to just go check it out.
I went to grab a shopping cart that was in a little area outside by the door.
I pulled....and found out they were chained.
I figured they must keep the carts we are to use inside.
I went inside.  No carts.
Finally, I walked back outside and watched a person slip a quarter into the little box
on the cart.  The chain unhooked from the cart.
AHA!!!  You had to PAY for a cart!  How dumb is that I thought....they might
save you some money on groceries, but they were going to get it back by charging
to use a cart!
Long story short....you DO get your quarter back when you return your cart!
Isn't that ingenious?  No more stray carts all over the parking lot.
You also need your own sacks or you will have to buy their sacks.
You also will have to SACK your own groceries....they WILL not sack them for you.
I have been known to throw my sack in the cart and ask that they throw everything
in the sack...it was a free standing sack.  They DID do that for me...when it was only
ONE sack.

Aldi's is a great place to load up on your staples.
I go to Aldi's FIRST and then fill in at other stores if needed.
I tried the coupon thing.....I was a failure....didn't have the time to
devote to it.
Aldi's was the next best thing.
I am going to show you what I got this week and let you comparison shop.
Now mind you, this is a weird week for shopping...with me buying some extra stuff
for the Easter holiday.
I also make a lot of stuff homemade, so don't buy too many pre-made items.

Black beans @ .55 x 2
Condensed Tom. Soup @ .49 x 4
Coffee Creamer @ $1.49
Refried Beans @ .69 x 2
German Coffee @ 4.99 x 2 (this is $1 higher than I normally get)
Deli Sliced Cheese @ $2.19 x 2
Elbow Macaroni @ $1.49
Powdered Sugar @ $1.49 x 2
32 oz. Ketchup @ 1.19 x 2
Cocoa Rice Cereal @ $1.59
Real Choc. Chips @ $1.79
Pecans @ $3.49
Sugar, 5 lbs. @ $2.68 x 2
Beef Hot Dogs @ $2.29 x 2
Multi-Colored Peppers @ $3.29
Old Fashioned Oats @ $1.99
Boneless Chick. Breasts @ $5.49
Sour Cream & Onion Potato Chips @ $1.39 x 2
Butter Quarters @ $2.29 x 2
Sour Cream @ .99 x 2
Oregano @ .99
Margarine @ .99
Confetti Cake Mix @ .95 x 2
Spring Frosting @ $1.19 x 2
Cream Cheese @ $1.29 x 2
8 oz. Cheddar Cheese Chunk @ $1.89 x 2

Subtotal = $77.97
Tax @ 8.5170% = $6.64
TOTAL - $84.61

If you are afraid of generic brands, I encourage you to try Aldi's brands.  The sour cream and onion potato chips taste just like the name brand LAY's chips.  The CHEESE is out of this world awesome. 
Normally, when I shop I spend an average of $75 for a week's worth of groceries.  I do not have to buy beef as we butcher our own.  Before the economy went south, I was able to shop for our family of 5 for about $50/week.  Now, for 3 of us and then some...we do the $75/week sometimes longer.

Wednesday, January 26, 2011

52 NEW RECIPES in 2011 (#4)

Homemade Queso & Tortillas

I have to tell you that the pics are terrible.
I had planned on making chicken enchiladas with
homemade tortillas, but it sort of changed....sort of.
While on allrecipes.com, I found this recipe for QUESO.
Please note:  I made my chicken in the crockpot with mexican
seasonings all day before starting this quest.
Since I had fresh chicken broth, I used it in the queso instead
of water.  I also cut the recipe in 1/2...that cheese
is EXPENSIVE.

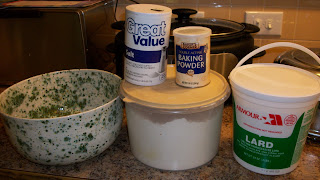
 Here are the ingredients for the TORTILLAS.
 4 cups of all purpose flour.
1/8 tsp. baking powder
1/2 cup shortening (I used lard)
1 cup lukewarm water w/ 1 1/4 tsp. salt dissolved in it

Mix the flour, baking powder and lard until crumbly. 
 Once it is crumbly, slowly pour in the warm water
and continue to mix with your hand.
It should start making a wetish dough...not
as dry as bread dough.
 Once you get a ball formed, let it rest for 20+ min.
covered with a warm wet towel.
(This is where I started making the QUESO)
 This picture is out of order....but too hard to try to move
it on this post....sorry.
Divide the dough into golf ball size balls.

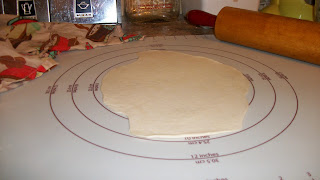
 Pound the ball flat and then using a rolling pin, begin rolling it
out...ideally, you roll it into a circle.
Ideally, it will be a circle when finished.
Guess what...."ideally" went out the window
with me....they still taste the same!  :P
 Heat a griddle...NO OIL.
Carefully peel up the tortilla dough and place it in the pan.
Let it cook for oh about 15 - 20 seconds and then
flip it over and do another 15 - 20 seconds.
You have to make them enough to figure out how long to cook them.
I cooked mine too long and they were more like chips after they
dried.
Here is my routine:
Roll
Put in pan
While one is in pan, roll another tortilla
1/2 way thru the rolling, turn tortilla in pan
Finish rolling
Take tortilla out of pan
Put new one in the pan
Repeat until finished.
 I used the leftover peppers and onions by
adding them to some chopped up chicken and sauteing them
with a tad bit of butter to put into the enchiladas...or
burritos....I have no idea what they really were.
I used my fancy food processor to make the refried beans.....
I just threw a can of pinto beans in it with 1/4 cup of lard
and hit the pulse button.
I heated on the stove, added salt and pepper.
 I heated the taco chips in the oven at 325 degrees for 10 min.
I topped the enchiladas/burritos with the QUESO.
Topped that with some hot salsa.
Dear husband ate 2 plates of this stuff!
He had to rush out the door and I didn't get a picture
of his "review".
He said he would give it 4 thumbs up if he had 4 thumbs.
 Here is the QUESO.
Cutting the recipe in 1/2 was A LOT of QUESO.
You could easily cut it into 1/4 and have PLENTY.
 The kitchen was a pit!
With practice, this will get quite easy.
From start to finish it took 1 hour and 45 min. to
get the food to the table.
It took another 45 min. to clean the kitchen....GAH!
Will I make it again?
YES!!!
Next time, SOMEONE ELSE will clean the kitchen....
See?  I shaved 45 minutes off that easily!!!
 Regan gave it 2 thumbs up!
She only ate the bean burrito and QUESO.

Thursday, January 20, 2011

Homeschool Art @ The Purple Glaze Studio

I know, it looks like a cake.....
but it is a rather large mixing bowl.
A few weeks ago, our church youth group went to
The Purple Glaze Studio to make ceramic crosses to
decorate the wall in the youth room.

 Regan finished her cross and got started on
some dragon goblet.  Of course, she
didn't finish before it was time to leave.....
which meant we would have to make a
return trip to The Purple Glaze Studio.

 Well, if you know me well, you know there
was NO way I was going to just sit and
watch her paint.
I've done this before and was really not that
impressed with how my ceramic piece turned out.
If you don't get EVEN painted layers, they will look
faded in certain areas on the piece.
 The sweet young worker girl showed me EXPLOSION
PAINT.  You just paint 2 coats....it has chunks in it
that will EXPLODE when heated and create
a 60's style effect on the pottery.
 Now THAT excited me enough to want to make an
ASHTRAY.....yah, you heard me right...and ASHTRAY.
No, I do not smoke nor allow anyone to smoke in my house.
I thought it would be way cool to have a 1960s looking ashtray
in my office to
prop my paint brushes on when painting!!!
GREAT IDEA RIGHT????
 Well, that is what I had planned on making when I got there....
until a HUGE bowl kept calling my name......
I think I have a mixing bowl fetish.....
So, I picked up the lonely bowl and picked my paint.
Since my kitchen cabinets are guacamole green,
I choose one that was going to be white with
green specks.
I slapped my two coats of paint on.....
and TAH DAH!!!

 I think it is UH MAZING!!!
This project cost me $25.19....
AND IT ISN'T MADE IN CHINA!!!
 See how I like to keep my bowls at arms reach in the kitchen.
I use mixing bowls all the time.
I just realized that one is actually missing in the picture....
I have a vintage turquoise print one as well.
I know you were worried I wouldn't show Regan's
goblet...well, here yah go!!!  She did an awesome job
on her project and earned an "A".  I'm the
teacher and I can do that!!!

Want to Read More???

Related Posts with Thumbnails