WELCOME! Come on and have a seat on my porch swing or would you rather go for a ride on a vintage bike? Feel free to have yourself a look around my blog. You'll find all kinds of goodies, from cookin' to farmin', to craftin', to just plain ole fun. Just look through the archives or click on one of the topics of interest to see posts related to whatever your little heart desires. You can also click on THE BAKERY header on this page to go to the most current post.

Showing posts with label sewing. Show all posts

Saturday, August 13, 2011

Camera Strap for My Nikon D90

I found this cute little tutorial on Pinterest.
(CLICK HERE) for the tutorial.
It was really easy, I made it in a little under an hour.
I did it in the usual FLYLADY WAY:  15 minutes sewing, 15 minutes cleaning.

Here are some hints I would use the next time I make one.

1.  Make a pattern first.  I do NOT sew, so I do not have the fancy cutting boards, etc.  Plus, it will make the next strap so much easier.
2.  Use FUSIBLE batting.  I did not.  Mine rolled a little.  I might even sew top stitching the length of the strap to give it that quilted look.
3.  The pocket was too small for my lens.  :(  I guess I would have to measure my lens to make sure I made the strap a little wider for the lens pocket.
4.  Use contrasting fabric for the pocket.  I did NOT do this and think it
would look so much cuter.
5.  Use "attaching a camera strap the Nikon way" video on YouTube so you
don't have little strap flaps.  It really makes me look like I know what I am doing.

Thank you Little Big Girl Studio for the great tutorial!!!!
Total Project Cost = $2.00

Sunday, August 7, 2011

Does Your Cell Phone Fall to the Bottom of Your Purse?

First I have to apologize for the poor picture
quality.
A certain youngest daughter borrowed my point and click
camera and left it at her grandparents' home.

Ok, now on to the important business.
I have a Blackberry Torch.
My very first "smart" phone.
I was so scared I would break the face of it, I
bought an Otterbox.
I broke the Otterbox.
I have not replaced the Otterbox.
Otterbox needs to make a better one or lower
the price.
The Blackeberry Torch has a terrible fallacy.
The lock key on it is very very easily unlocked.
Just trying to push it into a pocket will unlock it.
I do NOT like this at all.
I am sure people do NOT like
getting butt dialed by me.
I know I don't want to risk the data charges should
I accidentally hit the touch screen while
unlocked in my pocket.
I had to come up with a way of keeping track of it in my purse
and also tyring to keep it from getting unlocked in my
bottomless canyon purse.
Quite some time ago, I started clipping my keys
to the straps on my purse.
This kept me from digging and pulling everything out
in a panic even when I KNEW they were in my purse.
You know, that split second thought...."UH OH".
I know it is nerdy, but it works for me.
I use a rock climber thing-a-ma-jig.
So, if I can easily find my keys, why can't I find my cell phone?

I decided to give a cell phone pouch a try.
I can just make it like a key chain and hook
it to my keys.
I didn't want to go get specific material for this
project....I didn't even know if it would turn out.
I had found an old pair of capri's at our LOVE CLOSET.
No one wanted them, so I decided to re-purpose them.

I started by  searching YouTube for any tutorials.
I couldn't get the right key words or there aren't any out there
specifically for this product.
I improvised.
I watched a POUCH tutorial.
I had to make a few adjustments, like adding the little
hanger strap, but it was pretty easy.

I had to use interfacing again.....I had to read
the directions on which side to iron AGAIN...thank
goodness I saved them...or I am sure I would have to YouTube
the instructions...LOL.

After about 1 hour and 45 minutes, I had my
pouch finished.  I tried to take a picture of my
cute pouch holding the cell phone, but.....
like I said earlier....I didn't have my camera
and had to use my phone camera.

It is a little wider than I needed, but it works just fine.
I even added some little Velcro dots to
keep it closed.
I am thinking I could make these like the
with a zipper! 
I hope I've inspired you to try something new.

Saturday, May 14, 2011

Dave Ramsey Cash Envelopes/Wallets

 We started the official Dave Ramsey Financial Peace University
a few weeks ago.
I have always used the envelope method but got away from actually
using the envelopes...because they tore.
I used the big bulky plastic coupon organizer for years.

I found a great YOUTUBE tutorial on
making a zippered pouch.
She wasn't as detailed as I needed.....I broke 2 needles
learning how to put in the ding dang zippers.
I FINALLY got it!!!
Now I can whip them out in 25 minutes!!!
These used to be ONE pillow case.
Total cost for each was approximately $1.75 to make.
When I get better, I will make a tutorial...but you can go to
youtube and search zippered pouch and get several
tutorials.
In case you wanted to know, we have completed baby step #1.
We are plowing through #2.....

Monday, July 12, 2010

Are You SICK of Simplicity 2591 Yet??

Link

I'm NOT!!!

I had to get online and look at what others have done with this pattern....I am still in love with this dress.

You should be able to click on any of these pictures and be taken to the sites I found them....

This lady is just amazing....I love following her blog...she is making A DRESS A WEEK!! Right after I made mine, she posted about her Simplicity 2591....I was thrilled to say the least. I just love the fabric. My problem is....white and me do NOT get along very well.... :(

This sweet lady blogged about how many mistakes are in this dress...and is very thankful the pattern disguises it. I think it looks divine on her.


I like the ticking on this fabric....what about that viking hat??
I could see my daughter wearing this complete outfit.

Yep, totally adore the hula girl fabric....SU-WEET!


Yep, liking the stripes as well....very Coney Island, don't you think?


This ticking has tiny red crabs all over it....seersucker fabric. Make sure you look at her shoes!


Yet another version....it just amazes how the fabric makes all the difference in the look of this dress.


Wednesday, June 30, 2010

My 15 Minute Dress....Simplicity 2591, Recycled.

A few weeks ago, I embarked on an adventure of sewing....not to mention
that I've only sewed using a pattern ONE time in my life...and that was back
when I was a freshman in high school.
To read about dress #1, CLICK HERE.
To see dress #2, CLICK HERE and scroll to the bottom of the post.
Dress #1 cost $30.00
Dress #2 cost $5.00 because it was vintage material. 4 1/2 yds. $2.00.
Keep reading to find out about the cost of dress #3.
I like going to thrift stores for sheets to use on my west facing patio....I use them for curtains.
After making my first dress, I began to see the sheets as DRESSES....GO FIGURE.
I found this lovely sheet for a whopping #1.00!
I already had the pattern & thread....just needed a zipper.
I did read where a lady chose not to use the zipper and it worked out fine for her....I however, was not that brave.
I really liked the pink trim....and that got me to thinking that it would really look nice on the bottom of the dress.
Of course I worried about it making the dress look more like a dress made from a sheet....
I threw caution to the wind....and used the trim....

Here is what it would sort of look like without the trim....
A close up of the fabric pattern....there are pink flowers...the picture makes it look like just green leaves.

TA DAH!!! Here is Plus Size Polly modeling the finished dress!

The adorable fabric flowers are really just pins I got on clearance and can be removed and used elsewhere.....

I have to share this bit of 411 I learned about my sewing dummy...the more I work with it, the more I learn about her secret gadgets.
I was desperate to stick the pins in the pin cushion...but it was too far away....
so, I stabbed them in right there....
GUESS WHAT?
It is really meant for that....oh how handy!!!
Yah, keep laughing...remember I DO NOT SEW!!


So, what did you think? Does it look like a sheet? Oh well, it only cost me $3.00 to make....YES! $3.00 whole dollars.....I did it in less than 8 hours.

The reason I call it a 15 minute dress is because I worked on it 15 minutes at a time. I set the timer for 15 minutes and cleaned something in my house...when the timer went off, I reset it for 15 minutes and would sew. I did this ALL DAY and just about finished the dress in ONE DAY. Not to mention, the house got a really good cleaning that day....I cleaned out an entire room.
I got the timer idea from The Flylady...ever heard of her? www.flylady.net
Try it and tell me it doesn't work!!!

Tuesday, June 22, 2010

Vintage Finger Wave, Vintage Show, Vintage Material...SQUEAL!

It just so happened that my hair appointment fell the day before the Vintage Tulsa Show. My hairdresser, had some spare time to play with a finger wave on my hair. I have been talking to her about this for at least a year.
Then while I was flipping through her very modern hairstyle books....THERE IT WAS!!
The finger wave is all over the place!
So, she decided to give it the ol' beauty school try....
Ignore the dorky look....I am no good at taking pictures of myself...
I just don't know how those teens can stand to do this.
Yah, after taking this picture and looking at it on the computer....
I ran and emptied that trash.
That is certainly the upside of doing a blog...you get to see
yourself and your surrounding through "different" eyes.


I was really surprised to find that my manly man liked this style....
He never ceases to amaze me.


Here is the back...the color is darker than normal, but it stays that
way for about a week then the colors I love will come out.
I have a lot of people ask about my hair color...
My system is....
I do an all over color every other trip to beauty shop.
The in between trips...I get 2 - 3 colors foiled in.
I have no method to my colors I choose...I am even
trying to get up enough nerve to go LUCY red.
I feel like I only have one life...why limit the colors?


I. Want. This.
I just didn't have $95.00 for it....sniff, sniff.


I. still. want. this.


I think I shall learn to sew well enough to make this....IN PLUS SIZE, not BARBIE size....sheesh, it must have been a ZERO.


My sister, Terri, looking at vintage tablecloths.


Vintage cards galore!!!

Wouldn't these be adorable in a kitchen???


Now....here is my day old hair!
I liked it better the next day.
Also, this is my 2nd dress!
I used vintage material...$2.00/4 yards.
LOVE IT!
This dress cost only $5.00 to make!!!
The sign is from the Vintage Show....$25.00!
Won't it go great in my dining area????
That's my fire pit in the background!
The next Vintage Tulsa Show is August 7th & 8th....want to go with me???


Sunday, June 13, 2010

My FIRST Homemade Dress "Tutorial" - Simplicity 2591


Here is the inspiration for the homemade dress....
This is from J.C. Penny's. I loved the vintage style/look about it.
The problem is the very MODERN PRICE of $60.00! Sheesh....
It was on sale or I would have been taking a picture of it at the store....
I had a light bulb go off....and on...and off...and on...yah, I have those
glitches. I decided to head to the local sewing store to browse some patterns...
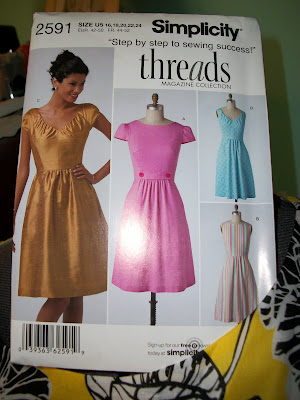
I found this pattern which of course was NOT on sale....
I picked out some material...the notions...yah, not even sure what notions are at this point. When it came to the fusible interfacing, I grabbed the nearest clerk and asked for help...she got me what I needed and was even nice
enough to tell me that I only needed ONE spool of thread...she wouldn't let me buy two! I liked this lady!!
I almost quit liking the lady when she said that someone just might try to call me Daisy Duke in the dress....hmmph.
I just smiled and said, "I have a father-in-law who isn't happy unless he is poking fun at me, so I think I can handle the Daisy Duke comment."

Now, I picked this particular pattern not only because it looked a lot like my yellow dress, but also that it says...and I quote, "Step by step sewing success!"

Yah, it neglected to say "Step by step instructions for the gal who has NEVER sewn a thing using a pattern." Well, I take that back. In 9th grade, I did sew a really cool, groovy, hip pair of baby blue walking shorts. I even made a 99/100 on them. That was Home Economics class....my teacher apparently didn't seem to care that they wouldn't go over MY THIGHS! Seriously, they fit TERRI...yah, TERRI who was a size ZERO at the time!
Terri thanked me though and it made it worth it!

Here I am getting all excited and posing with my inspiration dress...see, I am smiling!


This is what I was doing when I pulled that pattern out and saw there were no "step by step" directions for ME!
It took me FOUR, yep, FOUR....trying not to cuss, whining on facebook hours to iron the 5' x 3' tissue pattern.....
I had to IRON it BEFORE I could even attempt to roughly cut it out!

After I cut out my first piece...I had to remember to take a picture.
This is 3 yards of material...yes, I am fat. I know I am fat.
I other things to worry about than being fat....like MAKING THIS DRESS!!
Since I have more material, it is easier to work with....yep, that's my
story and I'm stickin' to it!

So, after taking these two pictures I gagged and ran and got the sweeper out and
quickly swept my disgusting floor.
No seriously....I sewed ALL DAY with a disgusting floor.
I was home alone and the dogs sure didn't seem to be too stressed about the floor.
The "step by step to sewing success was on TWO pieces of paper...for FOUR dresses. Need I say more????
Look! Here is the interfacing that the nice lady helped me get at the sewing store!

Here is my hand me down sewing machine....don't whine, I know it is a FANCY embroidery machine! Yes! I can EMBROIDERY the snot out of clothing....I just can't sew the CLOTHING. I have this machine because my mother has the mother of embroidery machines at her house....but it can NOT sew a dress! Neener, neener!

After reading the "How to make a dart" instructions....I really started sweating.
I whined some more on facebook.
I prayed.
I ate some chips.
I found YOUTUBE.COM!
I attempted my first boobie darts.
SUCCESS!!! I can't say enough about youtube....there are some very blessed people out there that actually make videos of making darts!

Then, I had to stitch something along the neckline....I have no idea why, I just did it.

Wow! It looked like a top!!

Then came the GATHER??? The "step by step" directions said use a LOOSE stitch...yah, THAT REALLY HELPED ME!
I pleaded on Facebook again!
I stressed.
I cried.
I prayed.
I youtubed....

I made a GATHER!! I normally have a 2.5mm stitch....I know this because that is what my very nice sewing machine said so....
I just doubled it to 5mm and that worked out fine.
Just know that if you have a very nice sewing machine, you must resist the urge to use the AUTOMATIC scissors when you need to do a gather....'cause you need that
extra string to PULL! Don't ask me how I know this....

At this point, I want you to scroll back up and look at the pattern picture.
Do you notice any POCKETS???
Me either.
Guess what?
There are pockets on this dress.
These are not your normal kind of pockets.
They are part of the BODICE AND THE SKIRT pockets.

This was the most stressful part of the whole thing.
There are NO YOUTUBE videos either...so don't bother looking.
If I had a video camera, there WOULD be Youtube videos...because I am sure it will take me just as long the next time to remember what I did to get it to come out right.
Anyhow....I managed to get it done correctly!
Pause.
"patting on back"
"doing the happy dance"
"bragging to Facebook friends"
Ok...there, now let's get back to business.

I got the front of the dress done!! At this point, it has been about 10 hours.
Now, please understand that it took FOUR hours to get the thing cut out!
I also took Facebook/Youtube breaks.
Here is a picture of the Youtube video for putting in a ZIPPER!

Most all of the "sewers" I talked to tried to warn me about the dreaded zipper!!!
Believe me when I tell you this. The zipper was a piece of cake BEFORE I tried
to use the zipper foot. Yah, according to the youtube, I needed a zipper foot....
The basting w/ the regular foot was WAY EASIER and I will sew it with a regular foot when I make my next dress.
The zipper foot, just make it "ugly".
Still, the pockets things were the hardest part....not the zipper!


Here is the back...still not sewn to the front yet.

See the way the pockets were part of the top and skirt?

Here it is inside out so you can see the pockets and the lovely facing.....the lace is a petticoat that is NOT attached to the dress.

The finished dress!
15 hours for my first dress.
I love the fit...which I am very glad because I have NO IDEA how to adjust as I go.
My sewing dummy is measured to fit me...so, I guess that was a plus..size...plus size? Get it??


I will certainly make another dress from this pattern!
I am hoping that since I already have the pattern cut out, I can shave off at least 3 hours!! I spied some really cute turquoise gingham w/ little cherries on it....
I almost forgot to tell you that the ENTIRE dress cost was $30.00...and that was buying the FULL PRICED pattern! I can certainly do it cheaper and quicker!!

Want to Read More???

Related Posts with Thumbnails