WELCOME! Come on and have a seat on my porch swing or would you rather go for a ride on a vintage bike? Feel free to have yourself a look around my blog. You'll find all kinds of goodies, from cookin' to farmin', to craftin', to just plain ole fun. Just look through the archives or click on one of the topics of interest to see posts related to whatever your little heart desires. You can also click on THE BAKERY header on this page to go to the most current post.

Wednesday, January 26, 2011

52 NEW RECIPES in 2011 (#4)

Homemade Queso & Tortillas

I have to tell you that the pics are terrible.
I had planned on making chicken enchiladas with
homemade tortillas, but it sort of changed....sort of.
While on allrecipes.com, I found this recipe for QUESO.
Please note:  I made my chicken in the crockpot with mexican
seasonings all day before starting this quest.
Since I had fresh chicken broth, I used it in the queso instead
of water.  I also cut the recipe in 1/2...that cheese
is EXPENSIVE.

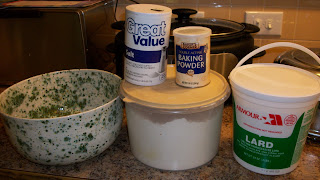
 Here are the ingredients for the TORTILLAS.
 4 cups of all purpose flour.
1/8 tsp. baking powder
1/2 cup shortening (I used lard)
1 cup lukewarm water w/ 1 1/4 tsp. salt dissolved in it

Mix the flour, baking powder and lard until crumbly. 
 Once it is crumbly, slowly pour in the warm water
and continue to mix with your hand.
It should start making a wetish dough...not
as dry as bread dough.
 Once you get a ball formed, let it rest for 20+ min.
covered with a warm wet towel.
(This is where I started making the QUESO)
 This picture is out of order....but too hard to try to move
it on this post....sorry.
Divide the dough into golf ball size balls.

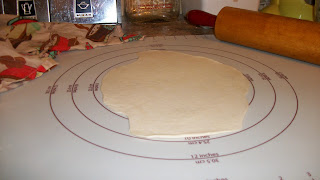
 Pound the ball flat and then using a rolling pin, begin rolling it
out...ideally, you roll it into a circle.
Ideally, it will be a circle when finished.
Guess what...."ideally" went out the window
with me....they still taste the same!  :P
 Heat a griddle...NO OIL.
Carefully peel up the tortilla dough and place it in the pan.
Let it cook for oh about 15 - 20 seconds and then
flip it over and do another 15 - 20 seconds.
You have to make them enough to figure out how long to cook them.
I cooked mine too long and they were more like chips after they
dried.
Here is my routine:
Roll
Put in pan
While one is in pan, roll another tortilla
1/2 way thru the rolling, turn tortilla in pan
Finish rolling
Take tortilla out of pan
Put new one in the pan
Repeat until finished.
 I used the leftover peppers and onions by
adding them to some chopped up chicken and sauteing them
with a tad bit of butter to put into the enchiladas...or
burritos....I have no idea what they really were.
I used my fancy food processor to make the refried beans.....
I just threw a can of pinto beans in it with 1/4 cup of lard
and hit the pulse button.
I heated on the stove, added salt and pepper.
 I heated the taco chips in the oven at 325 degrees for 10 min.
I topped the enchiladas/burritos with the QUESO.
Topped that with some hot salsa.
Dear husband ate 2 plates of this stuff!
He had to rush out the door and I didn't get a picture
of his "review".
He said he would give it 4 thumbs up if he had 4 thumbs.
 Here is the QUESO.
Cutting the recipe in 1/2 was A LOT of QUESO.
You could easily cut it into 1/4 and have PLENTY.
 The kitchen was a pit!
With practice, this will get quite easy.
From start to finish it took 1 hour and 45 min. to
get the food to the table.
It took another 45 min. to clean the kitchen....GAH!
Will I make it again?
YES!!!
Next time, SOMEONE ELSE will clean the kitchen....
See?  I shaved 45 minutes off that easily!!!
 Regan gave it 2 thumbs up!
She only ate the bean burrito and QUESO.

Thursday, January 20, 2011

Homeschool Art @ The Purple Glaze Studio

I know, it looks like a cake.....
but it is a rather large mixing bowl.
A few weeks ago, our church youth group went to
The Purple Glaze Studio to make ceramic crosses to
decorate the wall in the youth room.

 Regan finished her cross and got started on
some dragon goblet.  Of course, she
didn't finish before it was time to leave.....
which meant we would have to make a
return trip to The Purple Glaze Studio.

 Well, if you know me well, you know there
was NO way I was going to just sit and
watch her paint.
I've done this before and was really not that
impressed with how my ceramic piece turned out.
If you don't get EVEN painted layers, they will look
faded in certain areas on the piece.
 The sweet young worker girl showed me EXPLOSION
PAINT.  You just paint 2 coats....it has chunks in it
that will EXPLODE when heated and create
a 60's style effect on the pottery.
 Now THAT excited me enough to want to make an
ASHTRAY.....yah, you heard me right...and ASHTRAY.
No, I do not smoke nor allow anyone to smoke in my house.
I thought it would be way cool to have a 1960s looking ashtray
in my office to
prop my paint brushes on when painting!!!
GREAT IDEA RIGHT????
 Well, that is what I had planned on making when I got there....
until a HUGE bowl kept calling my name......
I think I have a mixing bowl fetish.....
So, I picked up the lonely bowl and picked my paint.
Since my kitchen cabinets are guacamole green,
I choose one that was going to be white with
green specks.
I slapped my two coats of paint on.....
and TAH DAH!!!

 I think it is UH MAZING!!!
This project cost me $25.19....
AND IT ISN'T MADE IN CHINA!!!
 See how I like to keep my bowls at arms reach in the kitchen.
I use mixing bowls all the time.
I just realized that one is actually missing in the picture....
I have a vintage turquoise print one as well.
I know you were worried I wouldn't show Regan's
goblet...well, here yah go!!!  She did an awesome job
on her project and earned an "A".  I'm the
teacher and I can do that!!!

Wednesday, January 19, 2011

52 New Recipes in 2011 (#3)

(Click the recipe title to see recipe)
I was skeptic about this dish because pasta
and sauerkraut just doesn't sound good to me.
However, the reviews made me think it HAD to be
decent.

 Surprisingly, very few ingredients.
Please note:  The recipe calls for white wine, I only had sherry.
I made due because no way was I going to drive all the
way back to town for 1/4 cup of white wine.
 While the pasta water was heating, I chopped all the ingredients.
Look!  Another recipe with fresh parsley....is this a pattern?
Parsley, garlic, red bell pepper, and onion.
 Heat the olive oil.
 When the water boils, it is time to put the pasta into
the water.

 While the pasta is cooking, saute the onions and bell pepper.
I had a HUGE onion....and it was a STRONG onion.
I was sobbing, not crying....WOW....that thing was STRONG!
I only used 1/2 of the onion.
 Add the garlic and kielbasa.
 Keep stirring and mixing the ingredients.


 Add the sauerkraut.
 Add the fresh parsley.

 Mix and cook a bit more.


 When noodles are done and drained.
Add them to the skillet.
 Mix.
The sauerkraut is the scent your house will be
filled with by this time.
 Regan has already come in at this point and said, "You
don't expect me to eat that do you?"
I did make her try a spoonful before she could say she
didn't like it.
She didn't like it.
 Regan ate her 3-Way Chili she had from lunch.
Kids come and kids go in the household.
Husbands stay.
Husband's opinion has more weight on whether this
recipe will be cooked again at The Bakery.
 Notice:  HE IS AT THE TABLE!
We have another SUCCESS!!!
Matter of fact, he kept saying, "This is really good!"
REPEATEDLY!!!
 This recipe does have a lot of chopping....I did it the
old fashioned way....with a knife and my trusted
Pampered Chef chopper.
Even with the amount of chopping, from start
to finish it took exactly ONE HOUR
to get it to the table.
We know that if it took ONE HOUR the first time to
make it, means it will be less the next time I make it.
TWO THUMBS UP!!!
Yes!  I will make it again!!!

Wednesday, January 12, 2011

52 NEW Recipes (#2)

HOMEMADE PIZZA

As some of you know, yeast scared me to death.
Last year, I vowed to make yeast my friend.
I started making rolls once a week until I got
comfortable with yeast.
I cheat and use a bread machine on the dough machine.
I have two bread machines now.
I can honestly say, my $5.00 thrift store BREADMAN
machine makes the best dough.
This year in my 2011 GOALS, I want to experiment with the
dough I use to make the the rolls.
It is true, if you make something long enough, you
will get more creative.

I added one tablespoon of Pampered Chef seasoning, Parmesan Garlic to the dough before I mixed it.
I was still scared to make a pizza dough.
I had fears.
1.  Would it taste too sweet?
2.  Would it make too thick or thin of a crust?
3.  Would it be enough for one crust or 20?
4.  Could I make it in the morning and cook it in the evening?
5.  Do I let it rise 2 times before putting in pan?

THANK GOD FOR GRANDMA ROSA!!!

After my success with the 15 minutes dress, I turned
to YOUTUBE.COM.
Sure enough, there were plenty of people showing
me the CORRECT (aka THEIR way) to make
a pizza.
I fell in love with Grandma Rosa...she even talks
with an Italian accent....HELLLLOOOO....she
had me at her first word.
I watched the video several times.
SHE EVEN CHEATS and uses FROZEN dough....
which didn't really help me with my delima.
So, I just grabbed the dough out after the first beep.
I oiled my pan like Grandma Rosa did.
I stretched and stretched and stretched and stretched
and stretched and scratched my cheek and stretched
the dough some more.
Grandma did NOT make her dough go to the edges...
and she didn't worry that her dough wasn't all
perfect.
I did.

 Grandma didn't use meat on her pizza.
I did.
I mixed hamburger and Blue and Gold sausage.
Grandma didn't add peppers or onions.
I did.
I sauteed red and yellow bell peppers and 1/2 an onion
in butter.

 Grandma used mozzarella cheese.
I used pepper jack because my
husband likes spicy....why
else would he have married me.
I digress.
Please make note:  I used my food processor
I got for Christmas from my sister, Terri.
THANK YOU SISTER!!!

 Grandma used peeled plum tomatoes.
I used a can of stewed tomatoes.
Grandmas crushed them and tore them
with her fingers.
I DID TOO!!
NO SAUCE on this pizza...which scared me.
I trusted Grandma Rosa!!
I added the meat and pepper/onion mixture.
I added A LOT of cheese.
I let it "rest" for 30 minutes just
like Grandma Rosa.
I baked at 350 degrees for 40 minutes
just like Grandma Rosa.

 HE DID IT AGAIN!
HE SAT IN THE CHAIR TO EAT!
Notice:  He has TWO (2) THUMBS UP!!
(He told me to make sure I noted that he has
2 thumbs up)
My Review:
I will make this again and again!
I guess I could make up more than one dough
and freeze if I need.
Either way, I believe it will take the same amount
of time for the dough.  (Almost 2 hours)
The rest was easy and I froze the leftover meat.
I did make a trial dough the day before and pre-baked
it.....NOT NEAR AS GOOD.
I even thought about baking the dough and
then freezing......NAH.....

Want to Read More???

Related Posts with Thumbnails